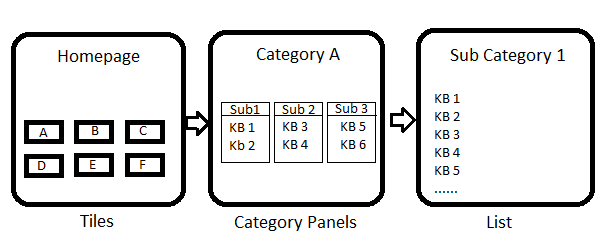
In Part 1 we configured the Category Entity in Dynamics 365 to have an Image Url field and allow users to edit this to support our design effort. Here again is our desired outcome based on Microsoft and Best Buy Support pages. This piece of the tutorial will provide and go over the Web Templates we will be creating, and how to apply them to pages.

Step 1: Create the Home Page Category Tile Web Template
-
- In Dynamics 365 Navigate to Portals → Web Templates
For a description of what a web template is click here. - Create a new Web Template called “Categories – Home Page”. For my example I started with “Category – Most Popular Categories” Web Template and modified it, but you can just create new and use the following code:
- In Dynamics 365 Navigate to Portals → Web Templates
{% assign count = count | default: 20 %}
{% assign category_url = sitemarkers['Category'].url %}
<div class="panel panel-default" style="padding: 80px 30px 180px 30px; border:none;">
  {% fetchxml popular_categories_query %}
  <fetch mapping="logical" returntotalrecordcount="true" count="{{ count }}">
    <entity name="category">
      <attribute name="categorynumber" />
      <attribute name="title" />
      <attribute name="createdon" />
      <attribute name="categoryid" />
      <attribute name="YOURPREFIX_imageurl" />
      <filter>
        <condition attribute="parentcategoryid" operator="null"/>
      </filter>
    </entity>
  </fetch>
  {% endfetchxml %}
  {% assign categories = popular_categories_query.results.entities %}
  {% if categories %}
    <div class="row" style="display:flex;flex-wrap:wrap;">
      {% for category in categories %}
        <div class="col-xs-6 col-md-3" style="margin-top:30px;">
            <a href="{{ category_url | escape }}?id={{ category.categorynumber | escape }}" class="thumbnail" style="height:100%;margin:0;">
              <img src="{{ category.wtc_imageurl | escape }}" alt="{{ category.title | escape }}">
            </a>
        </div>
      {% endfor %}
    </div>
  {% endif %}
</div>
Make sure to update “YOURPREFIX” with the prefix that match your organization’s settings.
I added a filter condition to only show categories that don’t have a parent to ensure the homepage is top level categories only. This will require some governance.
This is an extremely simple fetchXML query to get the Categories. Since Portals comes with Bootstrap v3, adding Bootstrap thumnail images and div’s is very easy as well.
Step 2: Update Home Web Template with the Tiles
- Open the Web Template “Home”
- Add {% include ‘Categories – Home Page’ %} where you would like the tiles to appear. You should now be able to view your Portal Homepage and see the Tiles.


